1. Main usage and features
1.1 Main usage
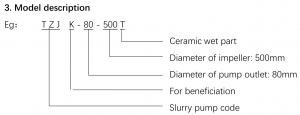
TZJK-T series ceramic slurry pumps are cantilevered, single-stage and horizontal slurry pumps. Their research and development are to accelerate the transformation of my country’s centrifugal slurry pumps, thereby replacing imported products. After fully absorbing the advanced technology foundation of domestic and foreign slurry pumps and combining the characteristics of our country’s beneficiation and metallurgical systems, the ceramic slurry pump is a new generation of energy-saving products reaching the international advanced level. It can be widely used in the hydraulic conveying of solid materials such as ore, concentrate, tailings, ash, silt and sand in mineral processing, metallurgy and other industries.
1.2 Main features
1.2.1 The wet parts are made of ceramic materials. It is resistant to all acid and alkali corrosion except hydrofluoric acid. It is 3-5 times more wear-resistant than Cr26, which can save more than 50% of operating costs for the processing plant.
1.2.2The shaft seal of the pump can be mechanical seal or packing seal. When the mechanical seal is used, the external shaft seal water can be eliminated, which is energy-saving and environmentally friendly and has no leakage.
1.2.3 The pump has advanced structure, high degree of generalization and is reliable in operation. It is easy to disassemble and repair.
1.2.4 The new molded line impeller has high efficiency.
2. Usage requirements
2.1 The temperature of the solid-liquid mixture transported by the pump shall not exceed 100° C.
2.2 The maximum size of solid particles in the liquid-solid mixture transported by the pump shall not exceed 10mm.
2.3 The bearing temperature of slurry pump in operation shall not be higher than 75℃.
2.4 If the pump is stopped for more than 2 hours, the slurry in the pump should be washed away with clean water. In order to prevent the slurry from blocking the impeller and being damaged when the pump is started.
2.5 When the slurry pump leaves the factory, the clearances between the impeller and the front/rear guard plate, the expeller and expeller ring have been adjusted, so there is no need to adjust when using.
2.6 Before starting the machine, observe whether the cooling box is filled with cooling water (for mechanical seals).
2.7 From the driving end, the pump rotates in a clockwise direction. To prevent the pump from being damaged, it should not be reversed.
2.8 Pumps with grease-lubricated bearings have been filled with grease in the bearings before leaving the factory, and the pumps can run directly.
4. Working principle
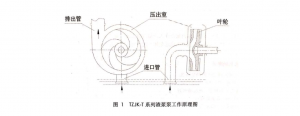
Before the TZJK-T series slurry pump is started, the pump cavity needs to be filled with liquid. When the prime mover drives the shaft and the impeller to rotate, the liquid moves in a circular motion with the impeller on the one hand, and throws out from the center of the impeller to the periphery under the action of centrifugal force. The liquid obtains pressure energy and velocity energy from the impeller. When the liquid flows through the volute to the discharge port, part of the velocity energy will be converted into static pressure energy. When the liquid is thrown from the impeller, the central part of the impeller creates a low-pressure area, which forms a pressure difference with the pressure of the suction liquid surface, so the liquid is continuously sucked in and discharged at a certain pressure.
The working principle diagram of TZJK-T series slurry pump is shown in Figure 1
5. Structure
5.1 This series of pumps are single-stage, horizontal slurry pumps. They have bracket structures, single suction radial impellers and replaceable wear-resistant shells. The pump sucks in axially and discharges tangentially. According to the conditions of use, the discharge direction can be rotated 45° in the circumferential direction.
5.2 The sheath, front liner plate, rear liner plate and expeller ring are made of ceramic materials. The impeller can be made of metal or ceramic materials, with good wear resistance and long service life.
5.3 Shaft seal
TZJK-T series slurry pump adopts packing seal or a combined shaft seal of expeller and mechanical seal. The role of the expeller is to reduce the pressure at the mechanical seal. The combination of the expeller and the mechanical seal ensures that the shaft seal does not leak for a long time.
Mechanical seals include single mechanical seals, double mechanical seals and cartridge mechanical seals.
5.4.1 Single mechanical seal
The structure diagram of the single mechanical seal is shown in Figure 2.
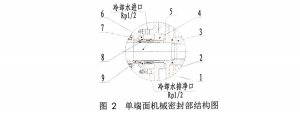
1 Expeller 2 Rear liner plate 3 impeller 4 Expeller ring 5 shaft
6 stationary seal ring 7 Mechanical seal 8 Seal shaft sleeve 9 Disassembly ring
The single mechanical seal is mainly used in the working conditions where cooling water is allowed to be injected into the pump body. The expeller ring is designed with a cooling water inlet. The cooling water flows through the expeller ring and expeller into the cavity of the pump body, and is discharged together with the conveyed slurry. The seal is characterized by long service life of the mechanical seal, and low wear of the expeller, expeller ring and rear liner plate.
5.4.2 Double mechanical seal
The structure of the double-end mechanical seal is shown in Figure 3:
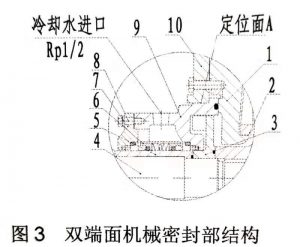
1 Rear liner plate 2 impeller 3 expeller 4 shaft
5 seal sleeve 6 mechanical seal 7 stationary seal ring
8 Set screw 9 Expeller ring 10 Pump body
The double-end mechanical seal is mainly used in the working conditions where cooling water is not allowed in the pump body. The cooling water inlet, outlet and emptying port are designed on the expeller ring. The locations are shown in Figure 4:
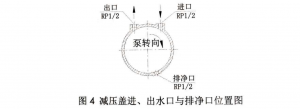
If there is a clean cooling water source on site, the cooling water can be directly connected to the expeller ring, enter from the inlet and out from the outlet, the circulating cooling mechanical seal has the best effect.
If there is no clean cooling water source at the user site, the cooling box should be used (installed at the factory). Fill the cooling box with clean cooling water and add it in time. In order to keep the cooling water clean, the water should be replaced regularly, which can be replaced every 3 months. To replace the cooling water, stop the pump, loosen the screw plug at the drain port on the expeller ring, and drain the original cooling water. Then tighten the screw plug at the drain port, loosen the screw plug of the cooling water injection port at the top cover of the cooling box, and refill with clean cooling water from the injection port.
5.4.3 Cartridge mechanical seal
The structure diagram of the cartridge mechanical seal is shown in Figure 5
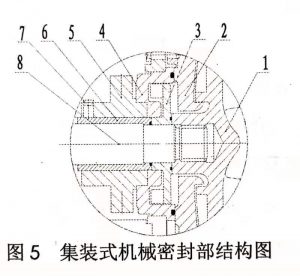
1 Impeller 2 Rear guard plate 3 Expeller 4 Expeller ring
5 Mechanical seal 6 Seal sleeve 7 Fastening screw 8 Shaft
Cartridge mechanical seals are mainly used for working conditions where cooling water is not allowed to be injected into the pump body. The seal is characterized by convenient installation and long service life.
5.4.4 Packing seal
Packing sealing requires flushing water not less than the pump pressure to be connected to the packing, and the flushing water volume is 15-20ml/min. If the packing water pressure is too low, the slurry will leak out and damage the shaft sleeve and packing.
Under normal conditions of packing seal, water will drop out from the shaft sleeve. If the packing is pressed too tightly, the packing will heat up or even burn. If the packing is too loose, the water will leak too much, and the bearing will be burnt after splashing into the bearing.
5.5 Bracket
The bracket of the TZJK-T series slurry pump has been optimized. Compared with the traditional bracket, the auxiliary steel on the pump head side have been added, which improves the cantilever structure of the slurry pump and increases the overall stability of the slurry pump. It has the effect of reducing vibration and noise when the pump is running, and effectively prolongs the service life of the machine.
5.6 Bearing
TZJK-T series slurry pump adopts face-to-face angular contact ball bearings or double-row tapered roller bearings on the positioning side, which mainly carry axial force. The middle of the face-to-face angular contact ball bearing is designed with a spacer ring oil injection structure, which is conducive to the oil injection and lubrication of the bearing. The free side adopts a cylindrical roller bearing with a reinforced inner ring without ribs, which mainly bears radial force. The bearing structure is more reasonable and the service life of the bearing is improved.
6.Installation of pump
6.1 Installation site
6.1.1 The pump installation site should be in a bright, dust-free building. If it must be installed outdoors, necessary rainproof, anti-exposure and anti-freeze measures should be taken, and special attention should be paid to the safety protection of the motor and the V-belt.
6.1.2 The place where the pump is installed should be as wide as possible for disassembly, assembly and daily inspection, and it should be ventilated.
6.2 Foundation engineering
6.2.1 When using a concrete foundation, full consideration shall be given to the weight of the pump and the pressure resistance of the foundation, so that the foundation has a sufficient pressure area. It is recommended that the appropriate ratio of concrete is: cement, sand, and sand to gravel in a ratio of 1:2:4.
6.2.2 In order to install anchor bolts, the concrete foundation should have sufficient reserved holes, and the surface of the foundation should be as flat as possible.
6.2.3 After confirming that the concrete is fully hardened, the pump can be installed.
6.3 Installation
6.3.1 Lift the machine set, put the anchor bolts into the fastening holes of the base, and tighten the nuts. Place the machine set on the foundation and hang the anchor bolts in the reserved holes.
6.3.2 Insert the inclined iron between the base and the foundation surface to make the base evenly supported. Take care to avoid inclination of the base and machine set caused by partial support. Leave enough grouting gap between the base and the foundation surface.
6.3.3 Place the level on the processing plane of the pump for observation, and correct the levelness of the machine body to ensure that the tolerance is within the range of 0.2mm/1m.
6.3.4 Pour the cement mortar of 1 part of cement and 2 parts of sand into the gap between the lower part of the base and the anchor bolt hole for several days. After the cement hardens, readjust the pump to the horizontal situation, and tighten the anchor bolts and nuts evenly and tightly.
6.4 Installation of piping
6.4.1 Since the pump is not allowed to bear additional load, a supporting device must be installed on the inlet and outlet piping.
6.4.2 Before installing the piping, check the inside of the pump body and the inside of the inlet and outlet piping, and connect the pump to the piping after confirming that there is no debris. It is required that the joint surface of each flange should not leak.
6.4.3 A section of detachable pipe should be installed at the suction pipe of the pump, the length of which should be long enough to disassemble the pump cover and replace the wearing parts, so as to facilitate the maintenance of the pump.
6.4.4 Shut-off valves should be installed on the suction pipe and outlet pipe of the pump to facilitate the maintenance and start of the pump.
6.4.5 A non-return valve should be installed between the pump outlet and the shut-off valve to prevent the backflow of slurry from damaging the pump.
Warning: Frequent backflow will seriously shorten the service life of the mechanical seal!
6.4.6 According to the requirements of product sealing form and structure, cooling water piping should be installed when the pump is cooled by water. The size of the piping, the installation location, the pressure, temperature, and the amount of cooling water are specified in the attached drawings (outline installation drawing). A regulating valve should be provided before the cooling water inlet.
6.5 Alignment of the Coupling
This series of pumps generally use a coupling to directly connect the pump to the motor. Use a dial indicator to check the alignment of the coupling, as shown in Figure 6:
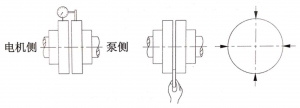
Figure 6 Schematic diagram of coupling alignment
The concentricity of the coupling and the allowable values of faces parallel are shown in Table 1:
Table 1 (Unit: mm)
| Model of motor | Concentricity | Faces parallel |
| Below 132M | 0.2 | 0.1 |
| Below 160M | 0.3 | 0.18 |
| 200M and more | 0.4 | 0.18 |
6.6 Tensioning method of V-belt (when V-belt is driven)
6.6.1 The transmission tape used in this series of products is generally a narrow V-belt, and ordinary V-belts can also be used according to user requirements.
6.6.2 Whether the tension of the V-belt is appropriate will directly affect the operation of the pump and the life of the belt and bearings. Usually adjust the belt according to the method shown in Figure 7 to get the proper tension.
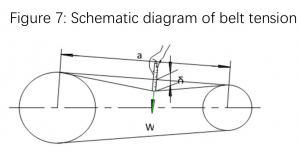
Figure 7: Schematic diagram of belt tension
At the center of a, apply an external force W in the direction perpendicular to the belt. When the deflection at this point is δ=0.016a mm, the external force W of each belt should meet the specified value in Table 2.
Table 2 Unit: N
|
Types of belt |
Narrow V-belt |
General V-belt |
|||||||
|
3V |
5V |
8V |
A |
B |
C |
D |
E |
F |
|
|
minimum value |
24.5 |
76.4 |
211.7 |
9.2 |
14.1 |
27.7 |
57.6 |
99 |
175.4 |
|
maximum value |
36.3 |
101.9 |
270.5 |
14.4 |
24.8 |
48.7 |
102.9 |
163.7 |
275.1 |
If the external force W value meets the requirements in Table 1, the belt tightness is appropriate. If the measured external force is too small or too large, the belt is too loose or too tight and should be adjusted.
Note: If the belt is too loose, it is easy to slip during operation and the efficiency will decrease, which will cause the belt to heat up and fatigue, and the belt life will be significantly reduced. Belt vibration can also cause bearing damage. If the belt is stretched too tightly, excess tension will be applied to the belt, which will cause abnormal wear and shorten the lifespan. At the same time, the bearing is also under heavy load, causing heating and wear of the bearing.
6.6.3 It is necessary to ensure that the grooves of the two pulleys are aligned and on a center line to ensure that the belts in the grooves will not wear unevenly. Therefore, the two V-type pulleys should be misaligned in plane: e≤6/1000×a (a is the center distance of the pulleys), the non-parallel included angle β ≤20′ between the axes of the two pulleys, e and β are shown in Figure 8.
Figure 8: Schematic diagram of belt pulley groove alignment
6.6.4 Slack may occur during the initial operation of the new belt, and the tension should be adjusted in time. After running for about a week, check the level of tightness again. If the belt is loose, adjust the tension again.
6.6.5 When replacing belts, all must be replaced. Do not use new and old belts together, so as not to concentrate the load on the new belt and cause the belt to slip or even break. It is forbidden to apply any belt oil on the belt and pulley.
6.6.6 The belt and pulley must be equipped with a protective cover and well ventilated.
7. Operation of the pump
7.1 Before running the pump, check the entire machine unit according to the following steps.
7.1.1 Check whether the connecting bolts and anchor bolts are tight and whether they are loose. Check whether the piping support is firm and the cooling water pipe is installed.
7.1.2 Rotate the shaft by hand according to the direction of the pump. The shaft should be able to drive the impeller to rotate without friction. Otherwise, the gap of the impeller should be adjusted until it turns flexibly by hand.
7.1.3 Check the rotation of the motor to ensure that the pump rotates in the direction of the arrow marked on the pump body (viewed from the inlet of the pump, the impeller should rotate counterclockwise). The pump is not allowed to rotate in the reverse direction, otherwise the pump will be damaged. After confirming that the steering is correct, connect the motor and the pump.
7.2 Operation
7.2.1 The outlet valve of the pump must be closed before starting the pump.
7.2.2 Run the motor idling and check whether the rotation direction of the pump is correct. From the inlet of the pump, the impeller should rotate counterclockwise.
7.2.3 Check whether the bearing contains oil and the amount of oil filling is correct.
7.2.4 Turn on the cooling water, or check whether the water level of the cooling tank is within the visible range of the window.
7.2.5 Fill the slurry pump with medium to prevent idling.
7.2.6 Turn on the machine, slowly open the outlet valve, check the flow, head, vibration, noise, temperature, after everything is normal, open the valve to the necessary place.
7.3 Shut-down
7.3.1 The outlet valve of the pump must be closed before stopping the pump.
7.3.2 Close the inlet valve.
7.3.3 Stop the pump and stop the cooling water. After the pump is stopped in winter, the cooling water must be insulated or drained to prevent the mechanical seal, rear pump cover, wet parts and other parts from being damaged by freezing.
7.3.4 If the pump is shut down for a long time, the solid material deposited in the pump body must be removed before it can be started again.
8. Use and maintenance of the machine set
8.1 Frequently check the connecting bolts of each part, and tighten the loose bolts in time.
8.2 Check the shaft seal device frequently. If the leakage is serious, stop the pump for maintenance.
8.3 Periodically check the vibration of the machine body and the bearing, and there should be no noise such as collision and scratching in the machine body. If abnormal vibration or noise is found, measures should be taken immediately or the pump should be stopped for inspection to find out the cause of the fault and eliminate it, otherwise the pump will be damaged.
8.4 Check the bearing temperature frequently, the temperature should not exceed 75℃.
8.5 Lubrication of the bearing
8.5.1 Grease lubrication:
Please add 3# high-quality lithium grease. The product has been filled with a proper amount of grease when it leaves the factory, and the user can run it directly, and please refill the bearing with grease according to the regulations in Table 3:
Table 3
|
No. |
Diameter |
The amount of grease |
The replenishment period of grease |
||
|
Drive end(g) |
Impeller end(g) |
||||
|
1 |
<60 |
40 |
30 |
n=1480r/min |
1.5 month |
|
2 |
<100 |
75 |
55 |
n=1480r/min |
1 month |
|
3 |
<150 |
90 |
70 |
n=1480r/min |
1 month |
|
4 |
<200 |
95 |
75 |
n=980r/min |
1 month |
|
5 |
>200 |
170 |
150 |
n=980r/min |
2 months |
When the actual rotating speed of the pump is higher than the speed in Table 3, the grease replenishment period should be shortened accordingly. Conversely, when the actual rotating speed of the pump is lower than the speed in Table 3, the grease replenishment period can be extended accordingly.
It is recommended to replace all the grease in the bearing after replenishing the grease 3 times. When replacing the grease, the cavity inside the bearing should be filled, and the cavity outside the bearing should be filled about 40%. Too much or too little is not conducive to bearing lubrication and will cause the bearing temperature to rise.
8.5.2 Oil lubrication:
Please choose 20# mechanical oil or similar high-quality oil. The oil level should be added to the specified oil level, and the oil should be replaced every six months.
8.6 If the pump is not used for a long time (more than 6 months), the grease or lubricating oil must be replaced before use. Other technical measures can also be taken, otherwise it is easy to cause adverse consequences.
8.7 Check whether the support of the inlet and outlet pipes are firm. It is strictly forbidden for the pump body to bear the weight of the pipe.
8.8 It is strictly forbidden to reverse the pump, otherwise it will cause damage to the product!
9. Maintenance of machine set:
9.1 Temporary repair: General inspection of bearings, bolts, pipes, etc.
9.2 Intermediate maintenance: In addition to minor repair items, seals and couplings should also be checked, and dirt attached to the rotor and other parts should be removed.
9.3 Overhaul: Comprehensively inspect and thoroughly clean all parts of the unit, and replace worn parts according to installation requirements.
When disassembling the pump (see the structure diagram), please pay attention: the wet parts are made of ceramic materials, which are brittle. Do not knock the wet parts and related parts with metal tools during disassembly and assembly. When disassembling the impeller, loosen the disassembly ring first, and then disassemble the impeller and other parts on the rotor. Adjust the gap between the impeller and the front/rear guard plates by adjusting the adjusting bolts. Under normal circumstances, the gap between the impeller and the front guard plate is about 0.5~1mm.
Particular attention should be paid to the installation and disassembly of the mechanical seal. The installation of the mechanical seal will directly affect whether the pump can run without leakage. When disassembling and assembling the mechanical seal, the action should be gentle and not savagely knocked.
Before installing the mechanical seal, use a dial indicator to detect the pump shaft runout and the concentricity between the shaft and the pump body. The runout of the pump shaft should be less than 0.05mm, and the runout of the locating hole of the expeller ring on the pump body should be less than 0.2mm. Otherwise, it should be corrected before installation.
In order to ensure the installation effect of the mechanical seal, the user can directly contact our company.
10. Problems and solutions
| No. | Forms of failure | Possible reasons | Solutions |
| 1 | Bearing is running hot | 1. Inconsistent unit centers; | 1.Check and adjust the alignment between pump and prime mover; |
| 2.Too much or too little lubricating oil; or impure lubricating oil; | 2.Adjust or replace the lubricant; | ||
| 3.The bearing is worn; or water enters the bearing bush; | 3.Replace bearings or lubricants; | ||
| 4.Vibration of the machine set. | 4.Check the rotor balance or run at a small flow point. | ||
| 2 | Insufficient flow or head | 1.The impeller is damaged; | 1.Replace the impeller; |
| 2.Air leakage into the suction pipe; | 2.Plug the leakage; | ||
| 3.There is a blockage in the pipeline; | 3.Clear the blockage; | ||
| 4.The rotating speed is reduced; | 4.Increase the speed as required; | ||
| 5.The submerged depth of the inlet pipe is not enough; | 5.Increase the submergence depth of the inlet water pipe; | ||
| 6.The inlet and outlet valves are not fully opened; | 6.Fully open the valve; | ||
| 7.The head is not consistent with the pump head. | 7.Choose a larger impeller. | ||
| 3 | Vibration and noise | 1.The rotating or fixed parts are worn; | 1.Repair the worn parts; |
| 2.There are sundries in the pipeline or pump; | 2.Check and remove sundries; | ||
| 3.Poor alignment of shaft and motor center; | 3.Adjust and align the center; | ||
| 4.Loose anchor bolts; | 4.Tighten anchor bolts; | ||
| 5.Bearing is worn; | 5.Replace the bearing; | ||
| 6.The shaft is bent; | 6.Replace the shaft; | ||
| 7.Pump cavitation; | 7.Reduce the installation height or thicken the inlet pipeline; | ||
| 8.The rotating part is out of balance; | 8.Check the reason and try to eliminate it; | ||
| 9.The inlet valve is not open enough; | 9.Open the inlet valve and adjust the outlet valve. | ||
| 4 | Serious leakage | 1.The friction pair is severely worn; | 1.Replace with a new mechanical seal; |
| 2.The dynamic ring or static ring is broken; | 2.Replace with a new mechanical seal; | ||
| 3.Uneven seal compression; | 3.Re-adjust the sealing combination; | ||
| 4.The O-ring is damaged. | 4.Replace the O-ring. | ||
| 5 | The pump cannot pump out the liquid | 1.There is air in the suction line or the pump; | 1.Fill with liquid and expel air; |
| 2.The inlet or outlet valve is closed or the pipeline is blocked; | 2.Open the valve and clear the blockage; | ||
| 3.The actual head is higher than the maximum head of the pump; | 3.Replace the pump with high head; | ||
| 4.Air leakage from the pump suction pipe; | 4.Prevent leakage on the inlet side; | ||
| 5.The water suction height is too large; | 5.Reduce the pump installation height, and increase the inlet pressure; | ||
| 6.The suction pipe is too small or blocked by debris; | 6.Increase the suction pipe diameter and eliminate blockage; | ||
| 7.Impeller steering error. | 7.Correct the direction of motor | ||
| 6 | The pump does not rotate. | 1.The impeller reverses and loosens, resting on the front guard plate; | 1.Check the steering and adjust the clearance; |
| 2.Impeller and pump body are blocked by solid materials. | 2.Remove silted materials. | ||
| 7 | Motor overload | 1.The pump and motor are out of alignment; | 1.Make sure the alignment of pump and motor; |
| 2.The relative density of medium is too large; | 2.Change the operation process; | ||
| 3.Friction occurs in the relative motion part; | 3.Repair the friction part and adjust the gap; | ||
| 4.The resistance of the device becomes lower, and the operating point is biased towards the place of large flow. | 4.Check and adjust the pressure of suction line and discharge line. |


